
A practical guide to stacking shorter exposures for night traffic trails
Implying motion is one of the most overlooked ways to add life to a photograph.
We usually think of this in daytime terms: a slower shutter speed to blur a waterfall, or panning with a cyclist so the rider is sharp and the background streaks by. One creates a blurred subject, the other a blurred background—but both suggest movement and passage of time.
The same idea becomes even more interesting after dark.
At night, moving points of light—from cars, buses, scooters, even bicycles—can become bright brushstrokes across your frame. The most familiar example is the classic “traffic trails” image: a city street or mountain road, recorded as continuous ribbons of light from a long exposure on a tripod.
At night, moving points of light—from cars, buses, scooters, even bicycles—can become bright brushstrokes across your frame. The most familiar example is the classic “traffic trails” image: a city street or mountain road, recorded as continuous ribbons of light from a long exposure on a tripod.
But as with most things in photography, the simple version only takes you so far. In this post, I want to walk you through a more flexible approach: shooting multiple shorter exposures and stacking them, rather than relying on a single very long exposure
The “classic” long exposure—and its problems
The usual recipe goes like this:
- Set up your camera on a solid tripod.
- Wait until shortly after sunset (or into the night).
- Choose a shutter speed long enough for traffic to move through the frame—say 8–15 seconds.
- Pair it with an appropriate aperture and ISO, and fire away.
Done carefully, this works well—especially on a busy street where vehicles pass constantly.
The challenge comes when:
- The traffic is intermittent or slow.
- You want multiple vehicles to trace a long route through the frame.
- The background includes fixed lights (street lamps, buildings) that can easily blow out in one long exposure.
- You’re dealing with warm temperatures and digital noise.
Imagine a winding road where each car takes several minutes to climb or descend. If you want one clean, continuous trail from multiple vehicles, your exposure might need to stretch to 10–15 minutes. That’s where the wheels start to come off.
What can go wrong with one very long exposure?
- Irrecoverable errors
One mistake—wrong exposure, accidental camera bump, an unexpected burst of light—ruins the entire frame. Ten minutes of effort, gone. - Noise and sensor heat
Long exposures, especially on warm nights, increase digital noise as the sensor heats up. You can end up with hot pixels and mushy shadows. - Exposure and dynamic range issues
Fixed lights (street lamps, house windows, illuminated signs) may blow out completely long before the rest of the scene is properly exposed. - Practical challenges
Keeping a camera perfectly steady for 8–10 minutes is harder than it sounds, especially if there’s wind, passing trucks, or the occasional enthusiastic dog.
So instead of betting everything on one long exposure, I prefer a different approach.
The better way: multiple shorter exposures + stacking
The solution is to shoot a sequence of shorter exposures and blend them into a single final image. This approach—often called image stacking—gives you:
- Less noise
Multiple shorter exposures, when combined, average out random noise without sacrificing detail. - Creative flexibility
You can choose which frames to include and exclude. If one is spoiled by a stray flashlight, you simply drop that frame. - Easier exposure control
You expose each frame properly for the scene as it changes, instead of trying to guess one “magic” exposure time. - Reduced risk
A bump, gust of wind, or odd flare ruins one frame—not the entire evening.
Let me walk you through a real-world example from a well-known road in Tuscany.
Case study: the winding road near Montichiello
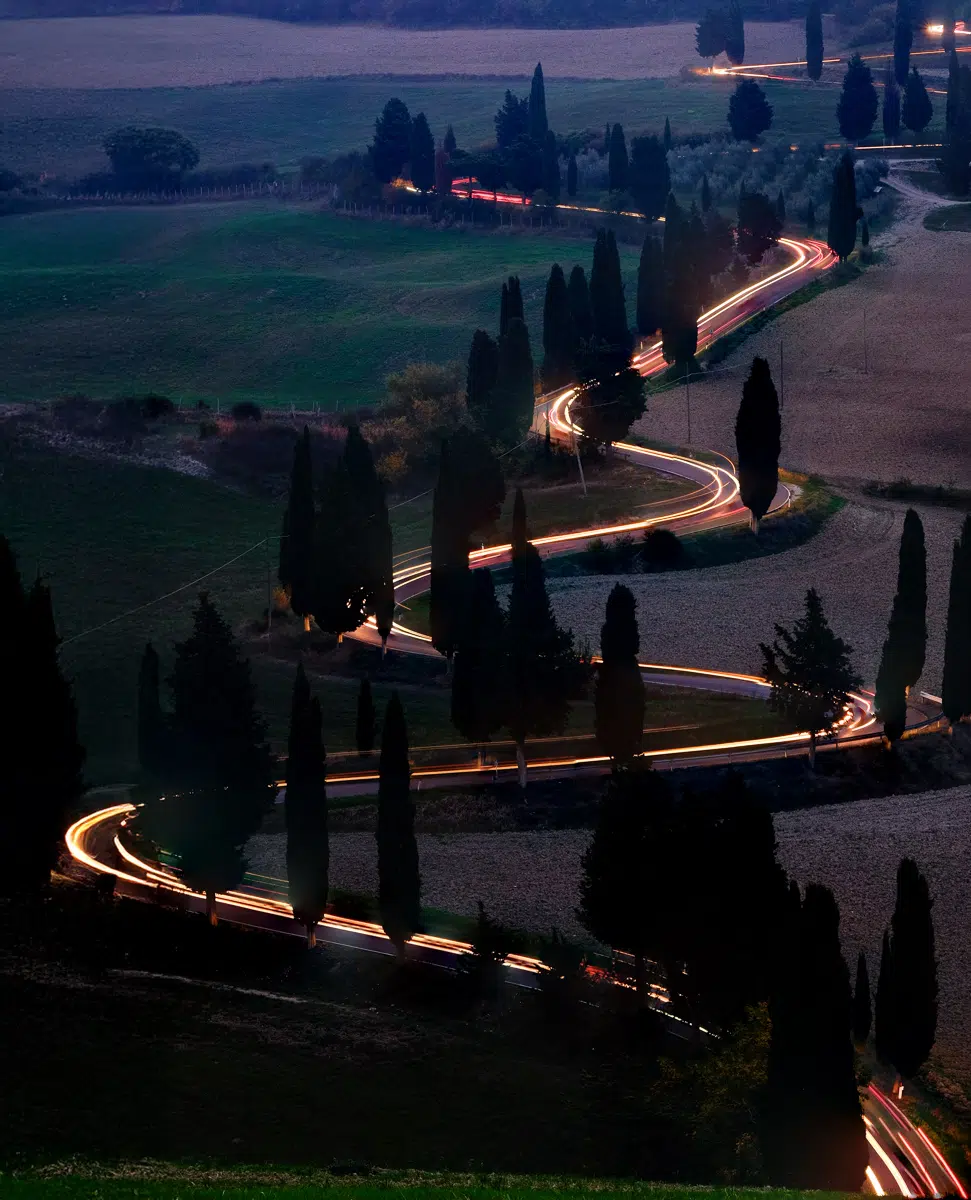
The image at the top of this post was made near a famous stretch of road near Montichiello, in Tuscany. It’s a series of tight switchbacks climbing a hillside—a perfect subject for light trails as cars slowly work their way up or down the slope.
From a lesser-known viewpoint across the valley, you get a clear view of the entire “S” curve of the road. The catch?
Cars move slowly and deliberately up or down. A single vehicle can take several minutes to travel through your frame.
A single 8–10 minute exposure here would:
- Risk blowing out fixed lights along the road.
- Accumulate a lot of sensor noise.
- Give you no second chances if something goes wrong.
So instead, I treated it as a stacking project.
Field workflow: how I shot it
Here’s the exact approach I used. You can adapt this to your own location.
1. Timing and light
- Arrive before sunset, so you have time to set up without rushing.
- In the middle latitudes, the sweet spot is usually begins 10–20 minutes after sunset, in the so-called blue hour, when:
- The sky still has colour and luminosity.
- The landscape isn’t completely lost in shadow.
- Vehicle lights are already clearly visible.
For this specific scene, I began shooting about 15 minutes after sunset.
2. Composition and setup
- Tripod: Rock-solid, legs carefully planted.
- Lens: A short to medium telephoto worked well to compress the curves of the road and fill the frame with the switchbacks. For this image, a focal length of about 150mm (Full-frame equivalent) worked well.
- Framing: Include enough of the surroundings to give context, but let the road and the light trails be the star.
3. Establishing your base exposure
For the Montichiello scene, metering indicated:
- 12 seconds at f/11, ISO 200
That gave me a good exposure for the ambient light and fixed elements in the scene (road, hillside, sky, any steady lights).
Because I knew I’d be stacking multiple frames and didn’t want to risk blowing out highlights, I underexposed by one stop:
- Final working exposure: 6 seconds at f/11, ISO 200
This gave me:
- Clean, controllable highlights on the road lights.
- A slightly darker base that I could easily brighten or darken to taste, later in post.
4. Shooting the sequence
Once the exposure was set:
- I waited for a car to enter the frame.
- Then I shot 6-second exposures back-to-back as vehicles moved along the road.
- Over roughly 15 minutes, I captured a series of frames (in this case, about 36 exposures).
Some frames had a car high on the road, some low, some maybe with more than one vehicle. The point is to create a library of light trails you can combine later.
When it became obviously too dark to maintain the same exposure without pushing ISO or slowing the shutter further, I wrapped it up and headed home.
Post-processing: from 36 frames to one image
Back in front of the computer, the process looks like this.
(I’ll describe a Lightroom-based workflow first, then mention an alternative if you like working in Photoshop.)
1. Cull and clean
- Import the full series into Lightroom Classic.
- Discard any frames with obvious issues:
- Camera shake
- Stray bright light (headlamp, phone, etc.)
- Vehicles you don’t want (e.g., bright truck headlights dominating one frame)
2. Basic adjustments and consistency
Pick one “reference” frame and:
- Adjust white balance, exposure, contrast, and basic tonal corrections.
- Apply any local adjustments (graduated filter on the sky, slight dodging/burning, etc.).
- When you’re happy with this frame, select the rest of the series and:
- Use Photo → Develop Settings → Match Total Exposures if there are small exposure differences across the sequence.
- Then Sync your Basic and local adjustments across all the selected frames.
Now you have a set of frames with a consistent look and tonality, ready to merge.
3. Merging the frames
You have two main options here:
Option A: Lightroom HDR merge (all-in-Lightroom approach)
- In the Library Module, select all the frames in your sequence.
- Go to Photo → Photo Merge → HDR.
- In the HDR dialog:
- Check Auto Align.
- Set Deghost Amount to Low (you’re mainly merging moving lights).
- Click Merge.
Lightroom will create a new DNG file combining the information from all the frames. You can then:
- Fine-tune overall exposure and contrast.
- Refine colour, clarity, and local dodging/burning as needed.
This method has the advantage of staying entirely within Lightroom and often does a surprisingly good job of combining the trails.
Option B: Photoshop layer stack (maximum control)
If you’re comfortable with Photoshop, you can:
- Select the series in Lightroom and choose Photo → Edit In → Open as Layers in Photoshop.
- Once the layers are stacked:
- Select all layers.
- Change the blending mode of each layer (except the bottom one) to Lighten.
- This tells Photoshop to keep the brightest pixels from each layer—perfect for combining light trails.
- You can then:
- Mask specific layers to remove unwanted lights.
- Adjust opacity of individual frames if one trail is too dominant.
- Flatten and send the final result back to Lightroom for finishing touches.
Either way, the result is the same: all the best bits of every frame combined into one final image, with more control and less risk than a single very long exposure.
Why this approach works so well
To summarize the benefits of stacking shorter exposures:
- Superior image quality
Less noise, better control over highlight detail, and the ability to keep shadow detail clean. - Creative flexibility
You decide which trails stay, which go, and how dense the final pattern of lights becomes. - Reduced risk
One ruined frame doesn’t end the evening; you just drop that frame from the stack. - More forgiving workflow
You can adjust your approach mid-shoot, refine exposure as the light fades, and stop when the scene no longer works.
Try it yourself
You don’t need a Tuscan hillside to try this. Any location with:
- A road or intersection where vehicles move through the frame,
- Some ambient light (city glow, twilight, or lit buildings),
- And a safe, stable place to set up your tripod,
is a perfect testing ground.
Start with:
- Shutter speed: 6–12 seconds
- Aperture: f/8 to f/11
- ISO: 100–400, depending on the ambient light
- Timing: 10–20 minutes after sunset is a great window
Then shoot a series, stack them, and see what you get. You’ll likely find that once you understand this approach, night traffic scenes become far more interesting and far less stressful.
If you’d like to see more examples or have questions about the process, feel free to reach out—or better yet, come to Tuscany with me, and we’ll practice it together on that winding road near Montichiello.
Thoughtful discussion is welcome. Comments may be moderated for clarity and relevance.