
The words above, while sounding a little like “clickbait”, come from an interview with legendary Magnum Photographer, David Hurn. Hurn has documented subjects as diverse as Beatlemania and the Hungarian Revolution of 1956. Now in his nineties, he is as sharp and incisive as someone half his age.
In the interview, Hurn offered a simple idea, but one so fundamental to the craft that it demands a total reset in how most photographers set their priorities.
“There are only two controls in photography,
—where you stand, and when you push the button.”
Once you grasp the idea behind those words, they’re impossible to ignore. Once you start looking at your own (or others’) pictures through that lens, a pattern emerges quickly: the images that work aren’t always the ones created with the “best” gear or the “perfect” settings. They’re the ones where the photographer made two decisions well—position and timing—and everything else simply supported those decisions.
And this isn’t limited to a particular genre:
Landscape, Portrait, Street, Wildlife, Macro or Still life? Doesn’t matter.
Phone camera, crop sensor, full-frame, or large-format? Doesn’t matter.
The subject or the equipment may change, but the two controls remain the same. Grasping the importance of this single idea will quietly improve almost every photograph you make.
What “control” really means here
When photographers talk about “control,” they usually mean the camera dials: aperture, shutter speed, ISO, white balance, and so on. Those do matter, of course; they shape how a photograph is rendered—how sharp it is, how noisy, how motion looks, how deep the blur is, how bright or dark the tones fall.
But most of those controls affect only how the scene is recorded.
Hurn’s “two controls” point to something more fundamental: the decisions that shape what the photograph is—the meaning, the relationships, the structure of the image, the moment the picture implies.
You can rescue a lot with good technique. But technique can’t rescue a weak viewpoint or a missed moment. On the other hand, a strong position and a strong moment can survive all kinds of technical imperfections.
So let’s talk about those two controls the way photographers actually use them in real life.
The first control: Where you stand
“Where you stand” sounds almost too simple, until you realize what it changes. Move a few steps, and you haven’t just “reframed” the subject—you’ve changed the geometry of the world in your frame.
Position controls perspective and relationships.
Let’s start with perspective.
Perspective refers to the relative size differences between elements in the foreground and background. Perspective changes as you move closer or farther from your physical subject. Perspective creates the illusion of the converging lines and the feeling of depth or compression. Moving closer to a foreground object in your frame will make it appear larger in relation to objects in the background. Moving farther back has the opposite effect.
A common misconception is that lens choice determines the apparent perspective in an image.
It does not.
The only thing that determines perspective is position: where you stand.
Here’s an experiment to try, or at least follow along. Use a medium telephoto, and frame a scene with an interesting object in the foreground. It doesn’t matter what the object is, but there should be an array of other objects at different distances in the background. If possible, choose an aperture that keeps the background elements relatively sharp. Shoot a single frame. Next, without moving the camera, switch to a wide-angle and photograph the same scene at the same aperture. Obviously, your wide-angle will take in more of the surrounding area than your telephoto, and all objects that were part of your first image will be rendered smaller in the wide-angle image.
Now, open the wide-angle image in any image editing program. Crop it, and enlarge it to exactly match the framing and size of the telephoto image. Obviously, the enlarged, reframed wide-angle image will not match the image quality of the uncropped telephoto version. However, what will appear the same in both images is the size and near-far distance relationships between the foreground and background elements. These perspective relationships are the same in each image precisely because your position did not change from one image to the next.
Back in the field, leave the wide-angle on your camera and move closer to the foreground object so it appears roughly the same size in your viewfinder as it did in your first telephoto image. The resulting image will suggest that a much greater distance separates the foreground and background elements in your frame than in your telephoto image or the enlarged wide-angle image from the same location.
The most striking revelation from this is that the perspective relationships created by lenses of different focal lengths taken from the same location are identical. This is so because position is the only thing that determines perspective in photography.
This change in perspective, tied to changing position, is responsible for enhancing the effect of converging lines, like wide-angle images of railroad tracks or highway lines taken from a low position that seemingly converge to a single point in the distance, or the compressive effect of telephotos, where they stack distant ridges of mountain peaks upon each other. But in every case, the illusion of convergence or compression is tied to a change in position, not to a change in lens.

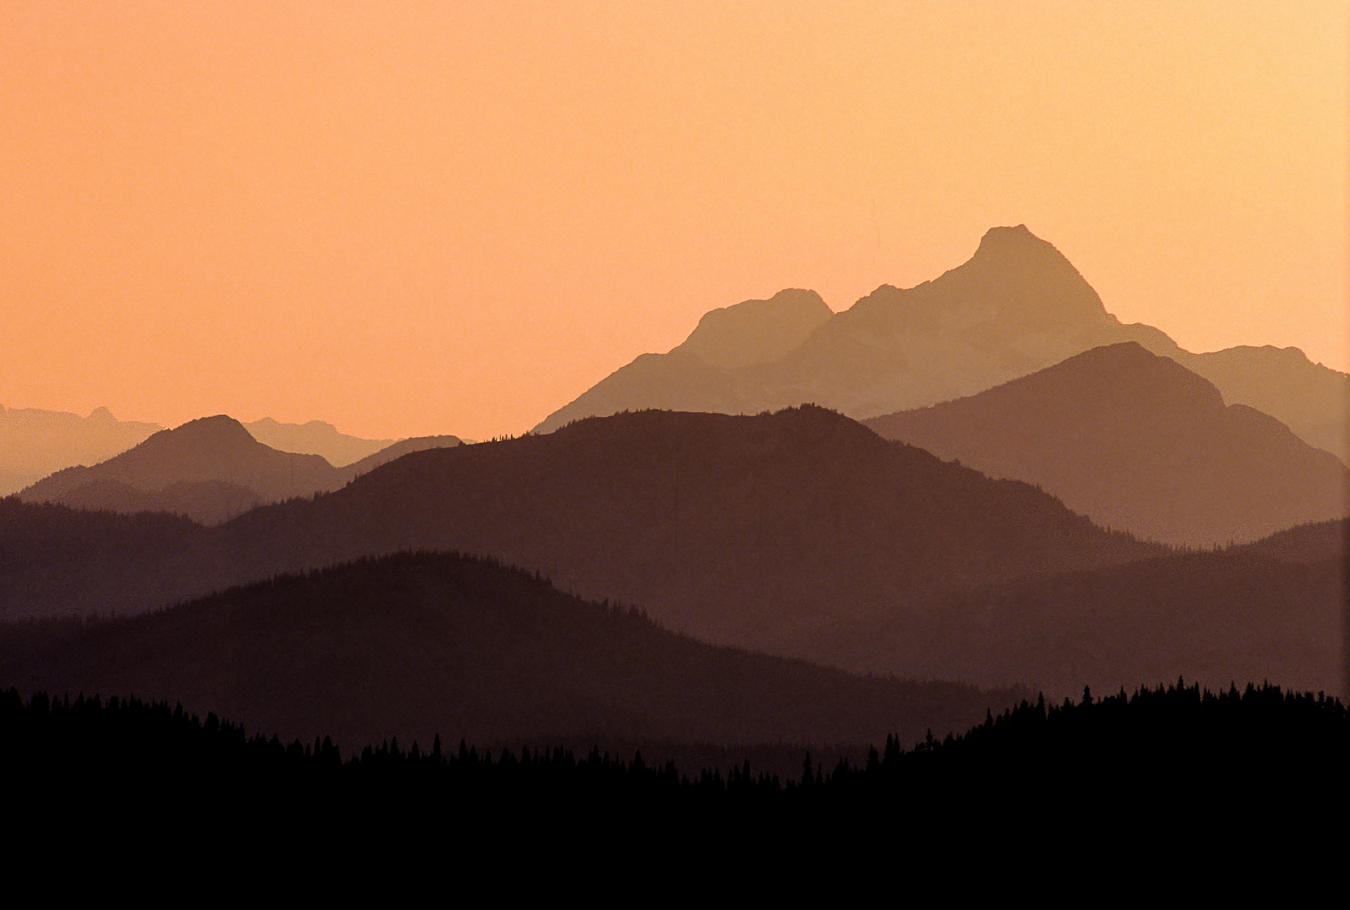
Position alone determines perspective: the apparent distance between foreground and background.
In the image on the left, (or the first of the two above, if you are on a mobile device) standing close to the foreground cypress trees and shooting with an 18mm lens (Full-Frame equivalent) exaggerates both their relative size and the distance to the distant villa visible (only just) on the distant hill. It also exaggerates the road’s relative width in the foreground compared to the distant background, creating the familiar “parallel lines converging in the distance” effect. The image on the right was shot with a 300mm (also “FF” equivalent). The distant mountain ridges appear to stack closely upon one another, when in fact they are separated by many miles.
In both cases, the relative distance from camera to foreground to background determines perspective. The camera next to the cypress trees was about 1/100th of the distance to the distant hilltop villa. In contrast, the distance from the nearest mountain ridge to the most distant peak is small in comparison to the distance from the camera to the nearest ridge.
“Standing” is a Verb.
Move your feet to change meaning, not just framing.
Where you choose to stand isn’t just about your position on a map. It’s about your choice of camera height, angle and tilt. It’s also about your willingness to move.
Where you choose to stand may require crouching a little lower, leaning a few degrees, stepping left or right to remove a merger, getting closer to simplify a composition, backing up to give your subject some breathing room, climbing one stair to change alignment, or reframing to reposition the background. This is also where a common misunderstanding creeps in: we treat lens choice as the primary control — a different lens is often wrongly used as a surrogate for movement.
Zooming changes framing. Moving changes relationships.
Capitalizing on the narrow angle of view provided by longer lenses isolates your subject from its environment. Using a shorter focal length allows you to get closer to your subject while showing it in rerlation to its environment. Yes, focal length affects perspective indirectly because you tend to move when you change lenses. But the real control is still the same: your position relative to the subject and background.
A few steps can save the day
You notice a compelling subject—maybe a person in beautiful light, a tree on a ridge, a doorway with texture. You lift the camera and shoot the obvious frame. When you look at the result, it’s… just “OK”. The subject is there, but the image feels cluttered or accidental. A bright object pulls the eye. A line intersects the head. The background competes.
If you move one step to the left or right, that bright distraction disappears behind the subject. Take a step forward, and the subject gains weight and presence. Crouch down a bit, and the background becomes clean. Nothing about the subject changed. But, the entire photograph changed anyway.
That’s the impact of “where you stand.” Now, let’s break these ideas down a little more
Separation and Mergers:
While the camera-to-subject distance determines perspective and size relationships, lateral movements (side-to-side, up-and-down) have a different but equally important effect on your images. For example, these lateral or vertical position changes affect whether your subject reads clearly against its background or disappears into it.
The art of composition often begins with arranging the shapes within your frame. Certainly, other elements of visual design need our attention as well, but two-dimensional shapes are fundamental to the two-dimensional world of a photographic image. One of the most common mistakes I see is allowing mergers to creep into an image. Mergers occur when two similarly toned objects in the frame overlap each other. The distinctiveness of each is lost in the merger, and the message in your image is weakened as a result. Mergers are most common in backlit and silhouetted situations, but can occur anytime two similarly toned objects overlap.
Often, a simple adjustment of your camera position is all it takes to eliminate a merger. Moving right or left, or up or down, will shift the relative positions of the subject, foreground, and background elements within an image.
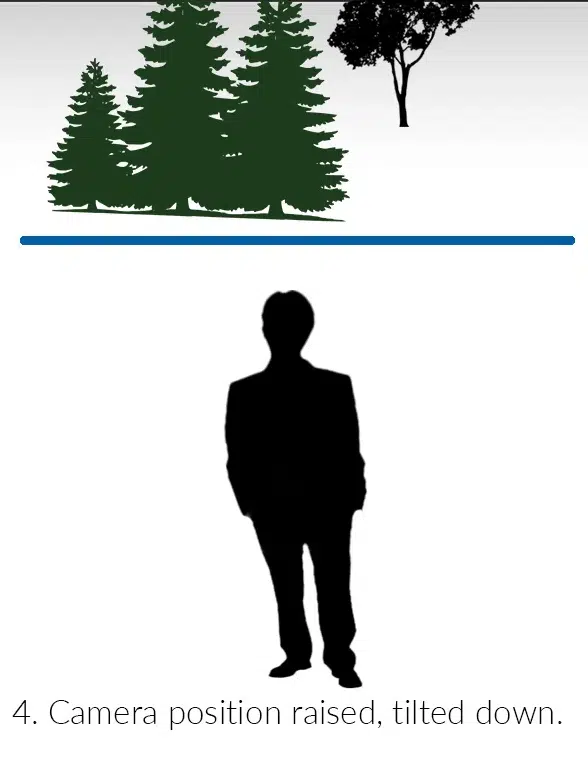
In the diagram on the right (below if you are using a mobile device), our subject is standing in front of a grove of evergreen trees. Some distance behind those is a lone tree of a different type. The blue line represents an implied horizon. There is a merger between the subject and the trees behind him.

Moving our camera position to the left and re-framing shifts the relative positions of the subject and the two background elements. The subject has shifted to the right relative to the background and is now clear of the trees that caused the merger. Note as well — since the lone tree is much farther into the background compared to the evergreens, its relative position has shifted as well. Moving left in this situation will make the more distant background objects also shift left relative to other background objects closer to the camera.

Lowering the camera position and reframing with an upward tilt lowers the apparent horizon and forces the apparent position of the subject up — in this case, clear of the background against the “sky.” This camera position will also tend to enhance the subject’s apparent stature.

Raising the camera position, when possible, does the opposite: it raises the apparent horizon and shifts the subject’s relative position downward relative to the background. This will also tend to diminish the subject’s apparent stature.
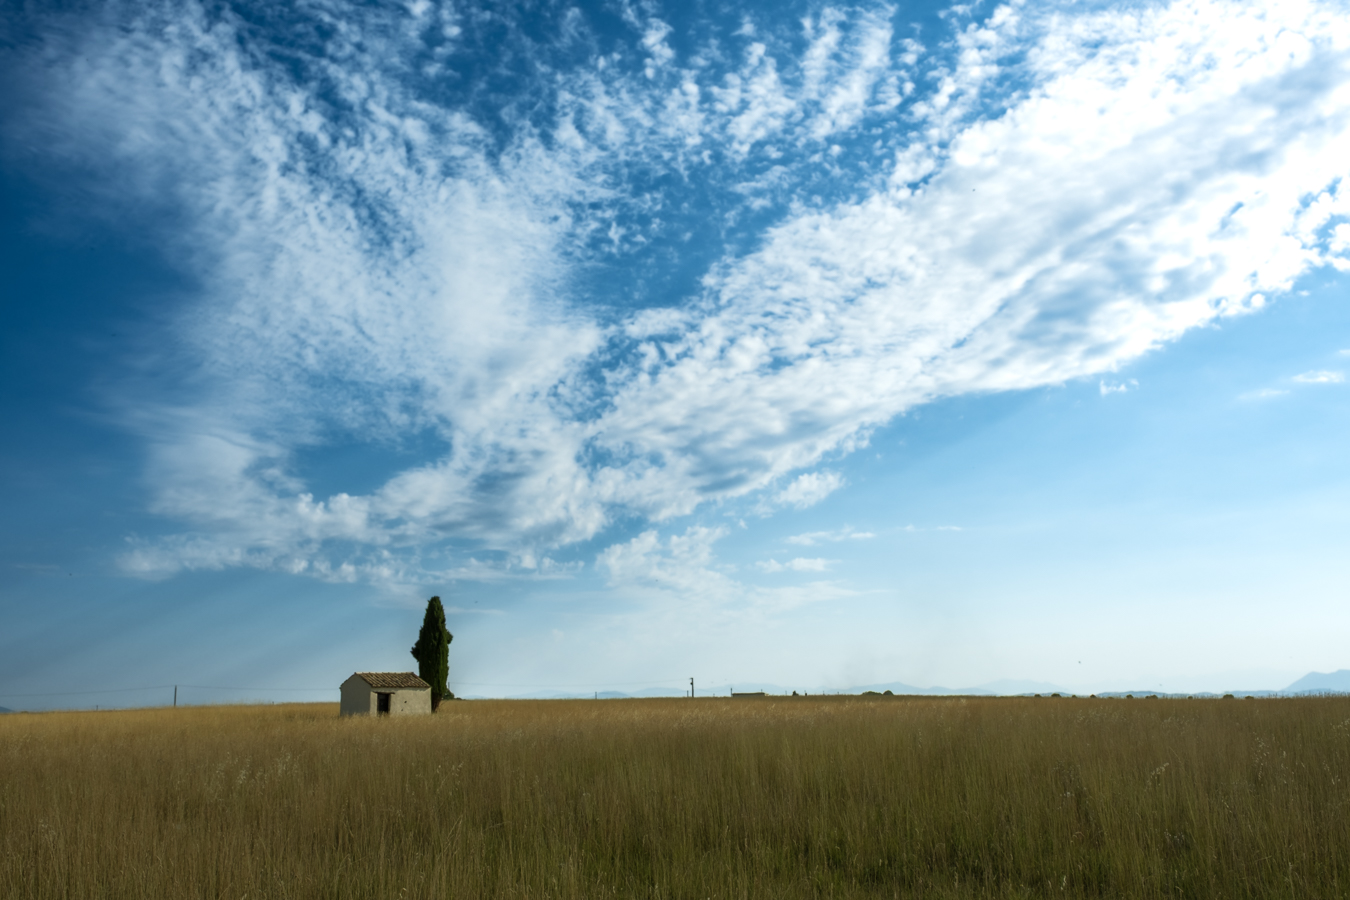
A Case of “Do as I Say, Not as I Do”

This is an example of a ‘where you stand’ near-miss: the left edge of the cross merges with the cypress tree behind it.
Two steps left would have separated the cross from the trees and revealed its full silhouette against the sky.
I should have reminded myself of this is important compositional habit to always follow:
- Check silhouettes and edges
- Look for objects “kissing” or overlapping in confusing ways
- Moving a step or two will often create a clean separation between merged elements.

Portrait of Margaret Thatcher, © Peter Marlow / Magnum Photos
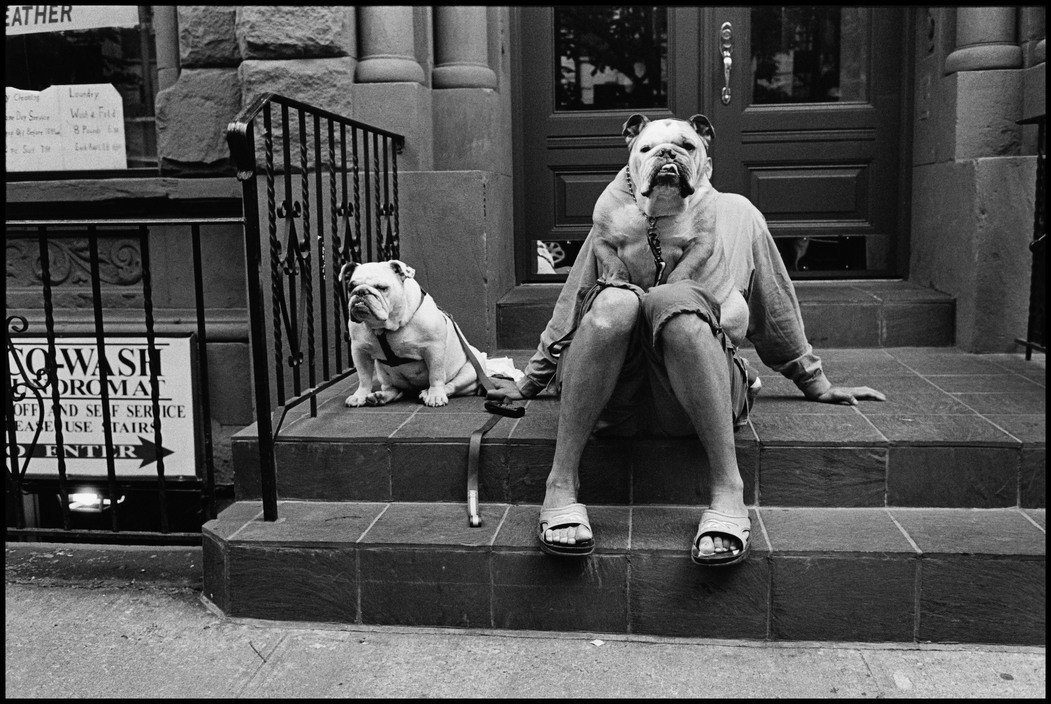
This image by Elliott Erwitt reinforces the popular belief that dog owners often look like their pets. Erwitt used up most of the entire roll of film looking for the precise position and precise instant when the forms merged, creating this comical and somewhat absurd image. Image © Elliott Erwitt / Magnum Photos
Layers
Layers can be created and used in your images in several ways. A landscape can be composed with a distinct foreground, middle and background. A macro subject can be layered against a background of swirling colour by shooting with a larger aperture to limit depth of field. But the layers most sensitive to small positional changes are those involving natural or man-made shapes arrayed on one another.
If your image contains shapes that could form layers, lateral movements can determine whether those layers stack in a confusing way or create a clean hierarchy. Small adjustments to either the right or left will easily make or break a layered composition.

Frame Edges
Lateral or vertical movements greatly influence what appears at the edges of your frame. Edges are among the most underrated and often-ignored parts of a photographic composition. Edges concern what touches the frame boundary, what gets clipped, and what distracts. Paying attention to what appears at the edges is important, more so because anything that occurs near or on an edge will appear to pick up “visual weight” — that tendency for certain objects to draw a viewer’s eye more than others.
Often, small lateral movements are all that’s needed to remove a distracting element from your frame or move it away from an edge. Finding an elevated position, perhaps just slightly higher, can eliminate a distracting element that intrudes into the foreground of your image. Elevated positions also often reveal patterns that are concealed by lower points of view.
Form the habit of scanning the edges of your frame in the viewfinder, paying attention to what lurks there, before hitting the shutter button, and you’ll strengthen your composition faster than just about anything I can think of.
Position determines geometry
So far, most of what we’ve been talking about comes back to one simple idea: where you stand determines the geometry of your photograph. Your position controls how the elements in the scene relate to one another, and even small changes in viewpoint can completely change how an image feels. We can summarize how your shooting position affects how the elements in your image relate to one another in a handful of ideas:
Alignment: Take a step or two to the side, or lower the camera slightly, and suddenly verticals and horizontals either fall neatly into place—or they don’t. Where you stand determines whether lines stay parallel, converge, or begin to distort, and those choices quietly set the image’s visual tone.
Symmetry: Stand dead center in a symmetrical scene—a hallway, a building façade—and the image feels balanced and calm. Move off-center, and that symmetry breaks. The result can feel more dynamic, more tense, or even a little unsettling. Nothing about the subject has changed—only where you chose to stand.
Leading Lines: Leading lines are especially sensitive to viewpoint. That road we mentioned earlier… shoot from a low position with a wide-angle lens and it becomes a strong visual invitation, pulling the viewer into the frame. Photograph the same road from higher up, and it may lose that sense of depth, becoming a flatter, more graphic shape.
Patterns: Patterns are created from the repetition of shapes — tiles, windows, market stalls, rows of flowers, jelly beans in a bowl, and endless other pattern-filled possibilities. Your position is crucial in revealing that repetition creates a pattern. A straight-on, frame-filling view, frequently from above the subject, is often required. Filling the frame with the pattern is crucial for it to be effective, and “read” as a pattern. A lower angle can also work, provided it doesn’t allow background elements to intrude and break the pattern. Sometimes, simply getting higher reveals patterns most people never notice.
Spacing and Balance: Finally, where you stand controls how space is distributed in the frame — for example, how much or how little room you leave around your subject. A higher viewpoint might spread elements out, creating a sense of balance and breathing room.
In every case, the subject stays the same. Only your position changes. And that’s the point: one of the most powerful creative controls you have isn’t a setting on the camera—it’s where you choose to stand.
Distance and Relationships
Distance shapes not just perspective, but emotional connection. It determines whether the viewer feels like a participant in the scene or a distant observer.
Think of a conversation across a restaurant table. When you and your companion lean in, your eyes see them from close range—almost like a wide-angle lens. Nothing looks distorted; instead, the closeness creates intimacy and engagement. Now imagine sitting farther away, perhaps across the room. You’re still looking at the same person, but the feeling changes: you’re no longer part of the exchange, you’re watching it. You’ve become an observer, rather than a participant.
Photography works the same way. When you move closer to a subject—often with a wider-than-normal lens—you don’t just change the geometry of the scene, you change the relationship. The subject hasn’t moved, and the lens may be the same, but the distance alters how connected the image feels.
Composition should be less about rules and more about relationships. A photograph isn’t a subject; it’s a subject in relation to everything else in the frame.


Getting close to your subject changes the perspective of the image. Moving from the role of observer to that of participant engages your viewers with the subject and their environment.
Creative Exercise: The 10-Step Frame
Pick one subject—anything—and make ten photographs without changing focal length.
- Don’t zoom.
- Don’t change your exposure settings unless you have to.
- Change only your position:
- forward/back, left/right, higher/lower, slight rotations.
- Which image is the clearest?
- Which has the best background?
- Which has the strongest visual hierarchy?
- What changed that made it better?
The positional changes you make can help remove distractions and place the visual elements in an effective and pleasing arrangement. Pay particular attention to elements that create visual distractions — objects that contribute nothing to the image but stand out strongly and draw the viewer’s eye. Every element in a photograph should contribute meaningfully to the final image and the story it creates; otherwise, it becomes a distraction.
Anything that doesn’t add to your story automatically takes away from it.
The Second Control: When you press the button
The second control is timing—pressing the shutter at the moment when the photograph becomes complete. This isn’t only about street photography or “decisive moments.” Timing matters in landscapes, portraiture, wildlife, still life, and abstract work—because the world is always changing, even when it seems still.
“Timing is meaning, not just mechanics.”
— Carlo Ravelli
Timing creates context and meaning. The moment you choose to press the button determines whether a gesture feels awkward or graceful, or whether an expression is revealed. It’s the instant when elements align: when a subject steps into the right space, the subject clears the horizon line, or a hand reaches exactly the right position.
Timing also governs light itself, as a cloud edge opens, reflections emerge, highlights shift, or the subject is revealed. A fraction of a second can be the difference between a photograph that feels complete and one that feels like a near-miss. Timing also shapes narrative — because the difference between one frame and the next may suggest two entirely different stories.
Timing is a skill, and like any skill, it requires practice to master. Perfecting the skill of timing requires developing a sense of anticipation —learning patterns: how people move, how waves form, how light shifts through clouds. Above all, it requires patience: staying long enough for the frame to resolve.
Good timing isn’t luck. It’s attention.
The frame is set, but the moment is yet to arrive
You choose a camera position that creates a strong arrangement of the visual elements in your frame. The photograph is nearly there. But something is off: perhaps the gesture is unfinished, the light hasn’t settled, or the wind is turning your foreground into a mess. You can feel the photograph waiting to be complete.
So you wait.
A few seconds later, the wind dies, or the person turns their head. Or perhaps the clouds shift, and the light falls precisely where it needs to be… so you hit the shutter at that instant. That wasn’t luck; you recognized what was needed to complete the image, and you waited for it. You framed the composition and waited for the image to appear.
What we’re talking about here isn’t always about split second timing. Cartier-Bresson’s “decisive moment” sometimes takes time to arrive and may last for a minute or more. This is more about understanding, and anticipating, what needs to happen to complete an image.
What happens when “Where” and “When” work together?
Here’s the part that turns the David Hurn quote from clever to practical: Where and When aren’t separate.
When you change position, you may change what moment matters. When you wait, you may discover new positions you couldn’t see while rushing. Often, the best photographs come from a simple attitude change in the field:
- Find the position with the strongest arrangement of visual elements.
- Ask yourself, “What has to happen to complete this image?” The answer might be, “nothing.” If so, hit the shutter. If not,
- Wait for what you need to complete the image
- Be prepared to change positions as the scene develops
Position sets the stage. Timing delivers the line.
— Edward R. Murrow
If either position or timing is weak, the photograph tends to feel incomplete. If both are strong, the image feels intentional—like it couldn’t have been made any other way.
Same Place, Different Time, Different Meaning
You photograph a scene in flat light: descriptive, quiet, factual. A few seconds later and a break in the clouds sends a slash of light across one section of the frame. Suddenly, the photograph has a subject. It has drama. It has a hierarchy.

Same location. Same camera. Same lens. A different “when” changed the emotional tone of the image.
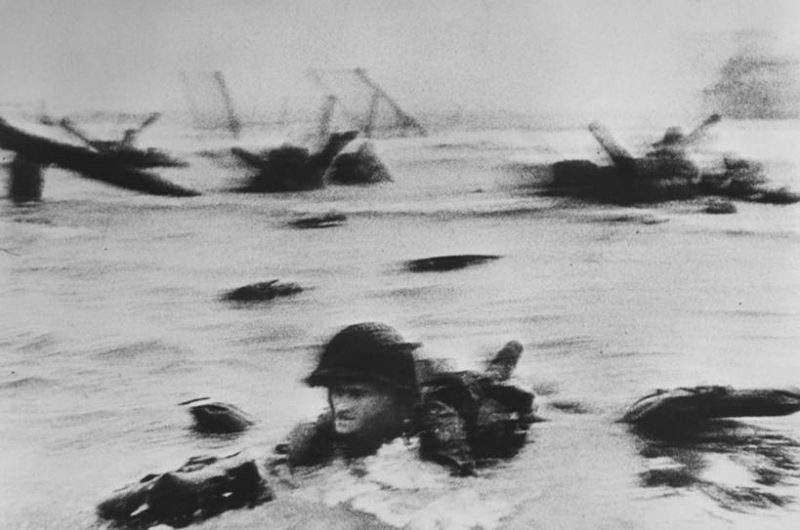
Waiting for the Light, Colour and Moment to Come Together

The raised arm is the moment—timing turns two figures into a story.
Timing is often about quiet observation — watching and waiting with a camera to eye, for that fleeting instant when all the elements: light, colour and gesture — align.*
* Light, Colour & Gesture is also the title of a book by Jay Maisel. Highly recommended.
Position and Timing are Seldom Independent Decisions
The right position is often a prerequisite for finding the right time — the instant when everything comes together.
I can only lay claim to choosing the right time, for it was only by dumb luck that I happened to be standing in the right place to catch these two biplanes as they came across the top of a loop with their smoke on.
Sometimes there is an element of luck involved.

— two aircraft, one coordinated moment.
Creative Exercise: The Five-Minute Watch
This could also be a 20- or 40-minute watch, if you’re so inclined. Find an interesting scene, perhaps just something that creates an interesting background. Find your shooting location, frame up a pleasing arrangement of shape, colour, and form, and then wait. Shoot only when something changes meaningfully.
Not “more frames = better,” but the opposite:..
- In those five minutes, ask yourself:
- What am I waiting for?
- What would make the frame feel complete?
- Shoot only when the answer appears.
Then review your frames and identify the one image that feels like the sentence—not just a collection of words.
Putting it all in Context
Of course, camera settings still matter, but as I said earlier, they can’t rescue a bad position or poor timing. You need to change your frame of mind when thinking about camera settings: They matter—but think of them as mostly “in service of the two main controls”. Settings can help you hold highlight detail or embrace silhouette, freeze gesture or show motion, separate subject with depth of field or keep its context sharp, Camera settings can shape tonality and colour to match mood.
Those are important choices. But they don’t substitute for viewpoint or timing. They support them.
Think of it this way:
- Where you stand + when you hit the shutter determine the photograph’s structure and meaning.
- Settings and processing determine how that structure is rendered.
Or, put more bluntly:
- If you didn’t stand in the right place, the best settings won’t save it.
- If you hit the shutter at the wrong moment, perfect camera settings won’t fix it.
Photography can get complicated fast—gear, settings, software, workflows, endless opinions. But the heart of it is deceptively simple.
Every photograph is built on two decisions:
Where you stand — the relationships you choose, the background you accept or reject, the geometry you design.
When you press the button — the moment that completes the frame, the gesture that makes it human, the light that gives it meaning.
The camera records. The photographer decides.
— author unknown
And the most powerful decision you can practice today isn’t a new setting or a new tool. It’s moving your feet with intention—and waiting long enough to recognize the moment when the picture finally becomes a photograph.
This essay is part of an ongoing series exploring how photographs are shaped more by choices than by gear.